Keresés

Részletes keresés

somat22 Creative Commons License 2014.03.01 0 0 270

Valami miatt nem fért ki a kód:

"

//
// FILE: dht11_test1.pde
// PURPOSE: DHT11 library test sketch for Arduino
//
#include <dht11.h>
dht11 DHT;
#include <Wire.h>
#define BMP085_ADDRESS 0x77
const unsigned char OSS = 0; // Oversampling Setting
#define DHT11_PIN 2
#include <LiquidCrystal.h>
LiquidCrystal lcd(8, 9, 4, 5, 6, 7);
// Calibration values
int ac1;
int ac2;
int ac3;
unsigned int ac4;
unsigned int ac5;
unsigned int ac6;
int b1;
int b2;
int mb;
int mc;
int md;

// b5 is calculated in bmp085GetTemperature(...), this variable is also used in bmp085GetPressure(...)
// so ...Temperature(...) must be called before ...Pressure(...).
long b5;

void setup(){
lcd.begin(16, 2); //16x2es lcd panel
lcd.setCursor(0,0); //kurzor kiinduló helye
Wire.begin();

bmp085Calibration();
}

void loop(){
int chk;
Serial.print("DHT11, t");
chk = DHT.read(DHT11_PIN); // READ DATA
switch (chk){
case DHTLIB_OK:
Serial.print("OK,t");
break;
case DHTLIB_ERROR_CHECKSUM:
Serial.print("Checksum error,t");
break;
case DHTLIB_ERROR_TIMEOUT:
Serial.print("Time out error,t");
break;
default:
Serial.print("Unknown error,t");
break;
}
float temperature = bmp085GetTemperature(bmp085ReadUT()); //MUST be called first
float pressure = bmp085GetPressure(bmp085ReadUP());
float atm = pressure / 101325; // "standard atmosphere"
float altitude = calcAltitude(pressure); //Uncompensated caculation - in Meters
// DISPLAT DATA
lcd.setCursor(0,0);
lcd.print("Par: ");
lcd.print(DHT.humidity,1);
lcd.println("%t");
lcd.setCursor(8,0);
lcd.print("Hom: ");
lcd.print(DHT.temperature,1);
lcd.println("C");
lcd.setCursor(0,1);
lcd.print("LNY:");
lcd.print(pressure, 0);
lcd.print("Pa");

delay(1000);
}
void bmp085Calibration()
{
ac1 = bmp085ReadInt(0xAA);
ac2 = bmp085ReadInt(0xAC);
ac3 = bmp085ReadInt(0xAE);
ac4 = bmp085ReadInt(0xB0);
ac5 = bmp085ReadInt(0xB2);
ac6 = bmp085ReadInt(0xB4);
b1 = bmp085ReadInt(0xB6);
b2 = bmp085ReadInt(0xB8);
mb = bmp085ReadInt(0xBA);
mc = bmp085ReadInt(0xBC);
md = bmp085ReadInt(0xBE);
}

// Calculate temperature in deg C
float bmp085GetTemperature(unsigned int ut){
long x1, x2;

x1 = (((long)ut - (long)ac6)*(long)ac5) >> 15;
x2 = ((long)mc << 11)/(x1 + md);
b5 = x1 + x2;

float temp = ((b5 + 8)>>4);
temp = temp /10;

return temp;
}

// Calculate pressure given up
// calibration values must be known
// b5 is also required so bmp085GetTemperature(...) must be called first.
// Value returned will be pressure in units of Pa.
long bmp085GetPressure(unsigned long up){
long x1, x2, x3, b3, b6, p;
unsigned long b4, b7;

b6 = b5 - 4000;
// Calculate B3
x1 = (b2 * (b6 * b6)>>12)>>11;
x2 = (ac2 * b6)>>11;
x3 = x1 + x2;
b3 = (((((long)ac1)*4 + x3)<<OSS) + 2)>>2;

// Calculate B4
x1 = (ac3 * b6)>>13;
x2 = (b1 * ((b6 * b6)>>12))>>16;
x3 = ((x1 + x2) + 2)>>2;
b4 = (ac4 * (unsigned long)(x3 + 32768))>>15;

b7 = ((unsigned long)(up - b3) * (50000>>OSS));
if (b7 < 0x80000000)
p = (b7<<1)/b4;
else
p = (b7/b4)<<1;

x1 = (p>>8) * (p>>8);
x1 = (x1 * 3038)>>16;
x2 = (-7357 * p)>>16;
p += (x1 + x2 + 3791)>>4;

long temp = p;
return temp;
}

// Read 1 byte from the BMP085 at 'address'
char bmp085Read(unsigned char address)
{
unsigned char data;

Wire.beginTransmission(BMP085_ADDRESS);
Wire.write(address);
Wire.endTransmission();

Wire.requestFrom(BMP085_ADDRESS, 1);
while(!Wire.available())
;

return Wire.read();
}

// Read 2 bytes from the BMP085
// First byte will be from 'address'
// Second byte will be from 'address'+1
int bmp085ReadInt(unsigned char address)
{
unsigned char msb, lsb;

Wire.beginTransmission(BMP085_ADDRESS);
Wire.write(address);
Wire.endTransmission();

Wire.requestFrom(BMP085_ADDRESS, 2);
while(Wire.available()<2)
;
msb = Wire.read();
lsb = Wire.read();

return (int) msb<<8 | lsb;
}

// Read the uncompensated temperature value
unsigned int bmp085ReadUT(){
unsigned int ut;

// Write 0x2E into Register 0xF4
// This requests a temperature reading
Wire.beginTransmission(BMP085_ADDRESS);
Wire.write(0xF4);
Wire.write(0x2E);
Wire.endTransmission();

// Wait at least 4.5ms
delay(5);

// Read two bytes from registers 0xF6 and 0xF7
ut = bmp085ReadInt(0xF6);
return ut;
}

// Read the uncompensated pressure value
unsigned long bmp085ReadUP(){

unsigned char msb, lsb, xlsb;
unsigned long up = 0;

// Write 0x34+(OSS<<6) into register 0xF4
// Request a pressure reading w/ oversampling setting
Wire.beginTransmission(BMP085_ADDRESS);
Wire.write(0xF4);
Wire.write(0x34 + (OSS<<6));
Wire.endTransmission();

// Wait for conversion, delay time dependent on OSS
delay(2 + (3<<OSS));

// Read register 0xF6 (MSB), 0xF7 (LSB), and 0xF8 (XLSB)
msb = bmp085Read(0xF6);
lsb = bmp085Read(0xF7);
xlsb = bmp085Read(0xF8);

up = (((unsigned long) msb << 16) | ((unsigned long) lsb << 8) | (unsigned long) xlsb) >> (8-OSS);

return up;
}

void writeRegister(int deviceAddress, byte address, byte val) {
Wire.beginTransmission(deviceAddress); // start transmission to device
Wire.write(address); // send register address
Wire.write(val); // send value to write
Wire.endTransmission(); // end transmission
}

int readRegister(int deviceAddress, byte address){

int v;
Wire.beginTransmission(deviceAddress);
Wire.write(address); // register to read
Wire.endTransmission();

Wire.requestFrom(deviceAddress, 1); // read a byte

while(!Wire.available()) {
// waiting
}

v = Wire.read();
return v;
}

float calcAltitude(float pressure){

float A = pressure/101325;
float B = 1/5.25588;
float C = pow(A,B);
C = 1 - C;
C = C /0.0000225577;

return C;
}

somat22 Creative Commons License 2014.03.01 0 0 269

Sziasztok!


Nagyon "buta" kérdés:


Tudnátok segíteni, hogy egy bmp085 szenzorral és egy dht11-el készítettem egy időjárás állomást, aminek az adatait lcd-re írom ki.


Sikerült megcsinálni, viszont nekem jobban tetszene, ha a légnyomásom nem Pa-ban lenne kiírva, hanem hPa-ban.

Ennek az átváltásához mit kellene módosítanom a sketchen?

(ha egyéb hibát találtok benne,még vannak benne felesleges dolgok is, jelezzétek, még erősen tanulom, de elsődlegesen az átváltásra lenne szükségem)


A kód:

"

void bmp085Calibration()
{
ac1 = bmp085ReadInt(0xAA);
ac2 = bmp085ReadInt(0xAC);
ac3 = bmp085ReadInt(0xAE);
ac4 = bmp085ReadInt(0xB0);
ac5 = bmp085ReadInt(0xB2);
ac6 = bmp085ReadInt(0xB4);
b1 = bmp085ReadInt(0xB6);
b2 = bmp085ReadInt(0xB8);
mb = bmp085ReadInt(0xBA);
mc = bmp085ReadInt(0xBC);
md = bmp085ReadInt(0xBE);
}

// Calculate temperature in deg C
float bmp085GetTemperature(unsigned int ut){
long x1, x2;

x1 = (((long)ut - (long)ac6)*(long)ac5) >> 15;
x2 = ((long)mc << 11)/(x1 + md);
b5 = x1 + x2;

float temp = ((b5 + 8)>>4);
temp = temp /10;

return temp;
}

// Calculate pressure given up
// calibration values must be known
// b5 is also required so bmp085GetTemperature(...) must be called first.
// Value returned will be pressure in units of Pa.
long bmp085GetPressure(unsigned long up){
long x1, x2, x3, b3, b6, p;
unsigned long b4, b7;

b6 = b5 - 4000;
// Calculate B3
x1 = (b2 * (b6 * b6)>>12)>>11;
x2 = (ac2 * b6)>>11;
x3 = x1 + x2;
b3 = (((((long)ac1)*4 + x3)<<OSS) + 2)>>2;

// Calculate B4
x1 = (ac3 * b6)>>13;
x2 = (b1 * ((b6 * b6)>>12))>>16;
x3 = ((x1 + x2) + 2)>>2;
b4 = (ac4 * (unsigned long)(x3 + 32768))>>15;

b7 = ((unsigned long)(up - b3) * (50000>>OSS));
if (b7 < 0x80000000)
p = (b7<<1)/b4;
else
p = (b7/b4)<<1;

x1 = (p>>8) * (p>>8);
x1 = (x1 * 3038)>>16;
x2 = (-7357 * p)>>16;
p += (x1 + x2 + 3791)>>4;

long temp = p;
return temp;
}

// Read 1 byte from the BMP085 at 'address'
char bmp085Read(unsigned char address)
{
unsigned char data;

Wire.beginTransmission(BMP085_ADDRESS);
Wire.write(address);
Wire.endTransmission();

Wire.requestFrom(BMP085_ADDRESS, 1);
while(!Wire.available())
;

return Wire.read();
}

// Read 2 bytes from the BMP085
// First byte will be from 'address'
// Second byte will be from 'address'+1
int bmp085ReadInt(unsigned char address)
{
unsigned char msb, lsb;

Wire.beginTransmission(BMP085_ADDRESS);
Wire.write(address);
Wire.endTransmission();

Wire.requestFrom(BMP085_ADDRESS, 2);
while(Wire.available()<2)
;
msb = Wire.read();
lsb = Wire.read();

return (int) msb<<8 | lsb;
}

// Read the uncompensated temperature value
unsigned int bmp085ReadUT(){
unsigned int ut;

// Write 0x2E into Register 0xF4
// This requests a temperature reading
Wire.beginTransmission(BMP085_ADDRESS);
Wire.write(0xF4);
Wire.write(0x2E);
Wire.endTransmission();

// Wait at least 4.5ms
delay(5);

// Read two bytes from registers 0xF6 and 0xF7
ut = bmp085ReadInt(0xF6);
return ut;
}

// Read the uncompensated pressure value
unsigned long bmp085ReadUP(){

unsigned char msb, lsb, xlsb;
unsigned long up = 0;

// Write 0x34+(OSS<<6) into register 0xF4
// Request a pressure reading w/ oversampling setting
Wire.beginTransmission(BMP085_ADDRESS);
Wire.write(0xF4);
Wire.write(0x34 + (OSS<<6));
Wire.endTransmission();

// Wait for conversion, delay time dependent on OSS
delay(2 + (3<<OSS));

// Read register 0xF6 (MSB), 0xF7 (LSB), and 0xF8 (XLSB)
msb = bmp085Read(0xF6);
lsb = bmp085Read(0xF7);
xlsb = bmp085Read(0xF8);

up = (((unsigned long) msb << 16) | ((unsigned long) lsb << 8) | (unsigned long) xlsb) >> (8-OSS);

return up;
}

void writeRegister(int deviceAddress, byte address, byte val) {
Wire.beginTransmission(deviceAddress); // start transmission to device
Wire.write(address); // send register address
Wire.write(val); // send value to write
Wire.endTransmission(); // end transmission
}

int readRegister(int deviceAddress, byte address){

int v;
Wire.beginTransmission(deviceAddress);
Wire.write(address); // register to read
Wire.endTransmission();

Wire.requestFrom(deviceAddress, 1); // read a byte

while(!Wire.available()) {
// waiting
}

v = Wire.read();
return v;
}

float calcAltitude(float pressure){

float A = pressure/101325;
float B = 1/5.25588;
float C = pow(A,B);
C = 1 - C;
C = C /0.0000225577;

return C;
}"

pgazso Creative Commons License 2014.02.26 0 0 268

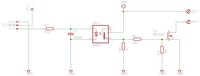
Néztem azt is, de nekem az annyira nem tiszta...először is nem RGB szalagom van, illetve nem értem, hogy 9V-ot miért köt a 12V-os szalagra... :)


Megcsináltam a nyáktervet ebből a kapcsolási rajzból és sokkal átláthatóbb...megvan a hely, ahol a 12V megy a panelbe, külön vannak a csatlakozók az arduinoból kijövő jelnek....stb.

Előzmény: John Zero (267)
John Zero Creative Commons License 2014.02.26 0 0 267

Kicsit túl van bonyolítva, nem kell optocsatoló.


De ember! Korábban küldtem linket, azt nézted?? Ott van kapcsolási példa is: http://learn.adafruit.com/rgb-led-strips/usage

(Mondjuk hülye módon pont a kapcsolási rajz nincs fent, csak az, hogy hogyan dugdosd össze a MOSFET-el.)


Előzmény: pgazso (266)
pgazso Creative Commons License 2014.02.25 0 0 266

Találtam a neten egy kész panelnek a leírását és csináltam egy kapcsolási rajzot az alapján.

Ez nem lehet jó hozzá esetleg?

pgazso Creative Commons License 2014.02.24 0 0 265

Ilyenek vannak. A 3528-asból 3 féle szín. 5050ből csak hidegfehér.

Előzmény: John Zero (264)
John Zero Creative Commons License 2014.02.24 0 0 264
Előzmény: pgazso (263)
pgazso Creative Commons License 2014.02.21 0 0 263

Ja és nem tudom, hogy nekem tényleg ezek vannak e a szalagon...

Előzmény: pgazso (262)
pgazso Creative Commons License 2014.02.21 0 0 262

Ez esetleg segítség lehet?


3528-ból kék, piros és melegfehér van

5050-ből csak hidegfehér.


Sajnos semmi mást nem találtam...

Előzmény: Prof (256)
John Zero Creative Commons License 2014.02.20 0 0 261

Ez várható volt.

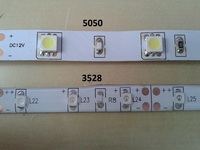
De általában ezek a kínai tömegtermékek 99%-ban ugyanarra az 1 csipre épülnek mind. Keresel valami hasonlót, ahol le van írva a chip, és kész, vagy neten keresel rá hobbista oldalakon hasonlóra.


Előzmény: pgazso (260)
pgazso Creative Commons License 2014.02.20 0 0 260

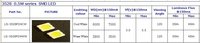
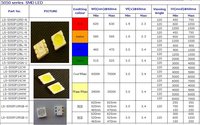
Ezekkel a kínaiakkal nem lehet beszélni... Idiótaságokat ír vissza... Köze sincs a kérdésemhez... Tehát nem tudtam meg semmi újat sajnos... Hogy tudnám még kideríteni a szükséges adatokat? 

Előzmény: Prof (256)
pgazso Creative Commons License 2014.02.18 0 0 259

Írtam az eladónak, hogy ha tud ilyen adatokkal szolgálni, írja meg nekem. Szerintem holnap válaszol...remélem :)

Előzmény: Prof (256)
pgazso Creative Commons License 2014.02.18 0 0 258

Bocsánat, másik nicknévvel én voltam... :)

Előzmény: Esküvői Dj - zpm.hu (257)
Esküvői Dj - zpm.hu Creative Commons License 2014.02.18 0 0 257

Nincs valami ötleted, hogy hogyan lehetne kideríteni a szalag adatait? Vagy valami "univerzális" megoldás nincs? :)

Előzmény: Prof (256)
Prof Creative Commons License 2014.02.18 0 0 256

Jó az, de a szalagok pontos adatai nélkül nehéz lesz... Illetve annyira nem, csak veszélyes.

Előzmény: pgazso (252)
Prof Creative Commons License 2014.02.18 0 0 255

sketch, bekötési séma (fritzing).

Szerintem sketch lesz, de ki tudja.

Előzmény: somat22 (253)
somat22 Creative Commons License 2014.02.18 0 0 254

A kép lemaradt.

somat22 Creative Commons License 2014.02.18 0 0 253

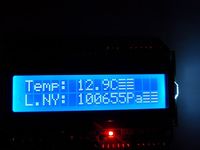
Ma volt egy kis időm, így az eddig tanultakból, és teszt programokból összeollózva sikerült összehoznom egy légnyomás, és hőmérő állomást, lcd-re kiírva.

A probléma csak annyi, hogy a kiírások végén vannak vonalas karakterek.


Gondolom én barmolok el valamit.

pgazso Creative Commons License 2014.02.18 0 0 252

Megjött a táp. Rámértem, terheletlenül 12,17 V jön ki belőle. A terhelhetősége 12V 5A.

A ledszalagokról sajnos nem sikerült kiderítenem semmi adatot...

Előzmény: Prof (235)
pgazso Creative Commons License 2014.02.17 0 0 251

Amiket beszúrtam linkeket, használható volt valamennyire? :) Nem vagyok egy nagy zseni ilyen téren sajnos. :)

Prof Creative Commons License 2014.02.16 0 0 250

Az AtMega k. jó cucc. Csinálj hozzá saját bootloadert, tedd köré a neked szükséges alkatrészeket (és csak azt), és jöhet a mehet!

A cikket elolvasom majd, köszönöm!

Előzmény: John Zero (249)
John Zero Creative Commons License 2014.02.16 0 0 249

Ja, megvan a cikk: http://paulfurley.com/arduino-isnt-just-for-hackers/


De tény, hogy én se az "alap" arduino-t raktam volna bele, hanem maximum az Arduino Mini-t vagy Pro-t. És persze rengeteg korlátja van az atmega 328-nak is, a szempont az olcsóság és elérhetőség is volt az alkatrészeknél.

De azért a stabilitása elég jó, ráadásul van pl. watchdog szolgáltatása is.

Előzmény: Prof (248)
Prof Creative Commons License 2014.02.16 0 0 248

Nos.

Az elv persze jó, de ettől az Arduino és klónjai (a Raspberry Pi-t, a Blackbone-t és a hasonló kütyüket is beleértve) belépőszintű, oktatási célú, kísérletezési platform marad. Egyszerűen műszaki kialakítása folytán alkalmatlan másra. Persze otthoni barkácsoláshoz mindennél jobb (kő egyszerű, rohadt olcsó és viszonylag üzembiztos), de kereskedelmi terméket azért elég meredek dolog építeni rá. Rohadt nagy (már a processzorhoz képest), rengeteg felesleges hóbelevanc van rajta, mindemellett nehéz illeszteni meglévő rendszerekhez (pl. 12V-ra autós felhasználáshoz). Mert azét valljuk be, elég hülyén néz ki egy próbatábla és egy halom kábel a kesztyűtartóban összeszigszalagozva.

De. Azt meg lehet csinálni, hogy kipróbálod, aztán tervezel hozzá egy nyákot (Fritzing), ráraksz mindent, ami kell, leveszel mindent, ami nem kell, és hopsz, van egy működő céleszközöd, ami pici, üzembiztos és jó esetben pontosan azt tudja, mint amire szükséged van (a programozhatóságot meg megoldod vagy egy soros programozóval vagy egy másik arduinoval ICSP porton.

Menj fel az AtMega honlapjára és nézd meg, mennyi féle mikrokontrollert kínálnak. Döbbenet. És ebből a 168/328, a 32u4 és a Mega2560 csak három (a Due-t hagyjuk most, az lényegében marginális, mert a 3,3 V miatt lényegében semmilyen meglévő cuccal nem kompatibilis, cserébe mondjuk rohadt gyors).

Ha a felhasználási módokat nézzük, adott mondjuk egy quadcopter, amire szeretnél egy PID-es stabilizátort rakni. Adott az Arduino és mondjuk egy MPU6050 modul. Van mondjuk 15 gramm alkatrészed, amiből használsz 4, maximum 5 grammot... A maradék meg holt felesleges.

Előzmény: John Zero (246)
John Zero Creative Commons License 2014.02.16 0 0 247

És ez is egy érdekes cég:

http://ruggedcircuits.com/html/custom_design.html


Arduino egyedi shieldeket terveznek és gyártatnak.

Előzmény: John Zero (246)
John Zero Creative Commons License 2014.02.16 0 0 246

Az az igazság, hogy én is ezt hittem (hogy nem végtermékhez van).

Amíg el nem olvastam egy cikket (nem találom), ahol a szerző azzal érvelt, hogy minden más technológia jön-megy (pl. PLC gyártó csődbe mehet, vagy kivezethet egy modellt a piacról), de az Arduino keretrendszernél garantálják, hogy menni fog (amíg él az arduino mozgalom), ha kiesik az egyik shield-gyártó, jön más, st.


Előzmény: Prof (227)
pgazso Creative Commons License 2014.02.16 0 0 245

Elfelejtettem említeni, EZT a tápot vettem hozzá. Sajnos amíg nem jön meg, nem tudok rámérni. Amit említesz programot letöltöttem, remélem én is sok hasznát veszem majd. :)

Előzmény: Prof (235)
Prof Creative Commons License 2014.02.15 0 0 244

Akkor mehet az éles. Valószínű, hogy a liquid_crystal.h-ban kell átírni pár paramétert (vagy jobb esetben magában a sketchben).


Előzmény: vfp (243)
vfp Creative Commons License 2014.02.15 0 0 243

Így kell fasználni:


LiquidCrystal_I2C lcd(0x27, 2,  1,  0,  4,  5,  6,  7,  3, POSITIVE);


ezzel működik a demo sketch


köszönöm a rávezetést

Előzmény: vfp (242)
vfp Creative Commons License 2014.02.15 0 0 242

Átnéztem a könyvtárakat, eltüntettem minden LDC-s könyvtárat és csak ez a speci maradt.

Így már lefordult a program. Eredmény:


i2cLCDguesser v1.4.1
 - Guess constructor for i2c LCD backpack
----------------------------------------------------------------
NOTE/WARNING: Guessing the i2c constructor is not really a
good thing since it could damage the hardware. Use with caution!
Do not leave things with an incorrect guess for too long.
i.e. advance to the next guess as soon as possible
when the guess in incorrect.
If the guess is correct, the constructor will show up
on the LCD.
----------------------------------------------------------------

<Press <ENTER> or click [Send] to Continue>
Scanning i2c bus for devices..
i2c device found at address 0x27
Device found: PCF8574
<Press <ENTER> or click [Send] to start guessing>
Trying: lcd(0x27, 2, 1, 0, 4, 5, 6, 7, 3, POSITIVE)
<Press <ENTER> or click [Send] to Continue>
Trying: lcd(0x27, 2, 1, 0, 4, 5, 6, 7, 3, NEGATIVE)
<Press <ENTER> or click [Send] to Continue>
Trying: lcd(0x27, 4, 5, 6, 0, 1, 2, 3, 7, NEGATIVE)
<Press <ENTER> or click [Send] to Continue>
Trying: lcd(0x27, 6, 5, 4, 0, 1, 2, 3, 7, NEGATIVE)
<Press <ENTER> or click [Send] to Continue>
Trying: lcd(0x27, 6, 5, 4, 0, 1, 2, 3, 7, POSITIVE)
<Press <ENTER> or click [Send] to Continue>
Trying: lcd(0x27, 4, 5, 6, 0, 1, 2, 3, 7, POSITIVE)
<Press <ENTER> or click [Send] to Continue>
Scanning i2c bus for devices..
i2c device found at address 0x27
Device found: PCF8574
<Press <ENTER> or click [Send] to start guessing>
Trying: lcd(0x27, 2, 1, 0, 4, 5, 6, 7, 3, POSITIVE)
<Press <ENTER> or click [Send] to Continue>


Ebből az első próbára volt a kijelzőn megjelenítés.

Csak azt nem tudom, hogy akkor ez mit jelent.

Előzmény: Prof (241)
Prof Creative Commons License 2014.02.15 0 0 241

Tippem szerint rosszul van felrakva a könyvtár. Restart, illetve talán még a folderekkel lehet kicsit bíbelődni (átrakni, ahogy írtad, hogy fura helyen van).

Előzmény: vfp (240)

Ha kedveled azért, ha nem azért nyomj egy lájkot a Fórumért!